[Cocoa] About the NSSlider control
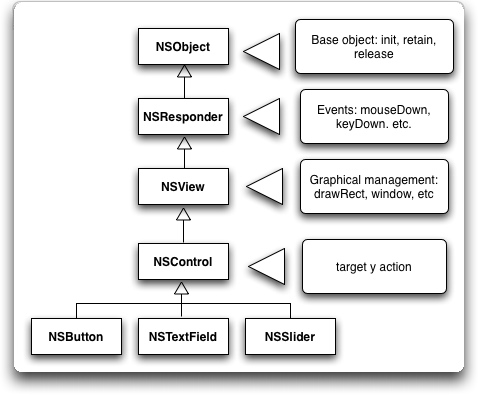
NSSlider is one of the subclasses of NSControl. It's one of the last classes in the UI controls inheritance chain, with other classes like NSButton, or NSTextField. Those are the three controls that we are going to use in this example.
It implements methods to get and set its value, its minimun and maximum value, and it can execute an action continously while changing its value, or it can execute that action when the user releases the mouse. It can have markers, and its value can be changed continously or only between the markers.

We are going to build a very simple Cocoa application just to show how this control can be used. If you want to read a more detailed tutorial about how XCode and Interface Builder both work together you can take a look at one of my previous posts here
To start, take a look at the finished application. The user will be able to drag the slider, whose value will be shown as text. There will be a "reset" button.

So, open XCode, and start a new project ( Cocoa application ). Double click the MainMenu.nib file, to open Interface Builder, and work the interface out.
Then, it will be time to create the application's controller. To do so, select the Classes panel in the MainMenu.nib window, and create a new subclass of NSObject. Name it AppController.
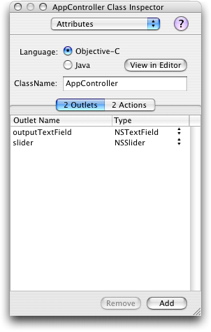
Now, create two outlets. Name the first one outputTextField, anf type it as NSTextField. Name the second one slider and type it as NSSlider. We will need these two outlets, because we will need to be able to change the value of both controls.
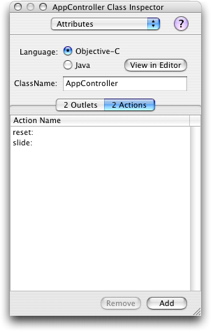
Now create two actions: reset and slide. Reset will be executed when the user clicks the "reset" button, and slide will be executed when the user drags the slider.
So, the event chain will be similar to this: the user drags the slider, the "slide" action is executed, so the controller is notified of the change, obtains the value of the slider, constructs an NSString to be displayed in the interface, and changes the value of the NSTextField ( outputTextField ). When the user click the reset button, the controller gets notified through the "reset" action, and it resets the slider value while updates the NSTextfield. Easy, isn't it?.
Well, we have created the outlets and actions, but that's not enough, we have to link everything. So, first, we will have to create the files that describe the AppController class. To do so, go to the Classes menu and select Create files for AppController. We will also have to create an instance of AppController. So click Classes->InstantiateAppController.
Now, go to the Instances panel. We are going to link AppController with the interface. We link those two entities ctrl+dragging from one element to another. But how?. Remember AppController?. It had two outlets. One of them was "outputTextField". That's the instance variable of the AppController class that points to the UI control. So, to link them, Ctrl+drag from the instance of AppController to the NSTextField in the interface. You are dragging from the element that needs to know something to the element that is needed to be known ( if this sentence makes any sense ). When you release the mouse, select outputTextField in the Inspector, and click "connect". Do the same with slider and the NSSlider.
To link the UI controls actions with the controller, Ctrl+Drag from the interface to the instance of the AppController class. Select the proper action for the button and the slider, and connect them.
Save the nib file. You are done with the interface. Now go back to the project window, and edit the AppControler.h file.
There are only two things that we will need to add to the AppController header. First, we will need to store the slider's initial value, so we can reset it. So define a class variable for that purpose ( for instance, initValue ). We will need also to create a NSString to update the NSTextField, and that string will be something like "Value: 24". So we will encapsulate the creation of that string into a new method, called buildFeedbackString.
So, the AppController header will be:
#import

@interface AppController : NSObject
{
IBOutlet NSTextField *outputTextField;
IBOutlet NSSlider *slider;
float initValue;
}
- ( IBAction ) slide: ( id ) sender;
- ( IBAction ) reset: ( id ) sender;
- ( NSString * ) buildFeedbackString: ( float ) value;
@end
And now, let's implement it. First, implement the buildFeedbackString method:
-( NSString * ) buildFeedbackString: ( float ) value
{
return [ NSString stringWithFormat: @"Value: %.1f", value ];
}
We will show the slider's value with just one decimal position. That's why the mask I have used is %.1f. Try this: @"Value: %f" and you will see the difference.
Now, implement the slide method. We will grab the slider's value, add it to the application's log ( for debugging purposes ) and then update the NSTextField with that value. So, the slide method will be:
- (IBAction)slide:(id)sender
{
float sliderValue = [ slider floatValue ];

NSLog( @"float value %f", sliderValue );

[ outputTextField setStringValue: [ self buildFeedbackString: sliderValue ] ];
}
When the user clicks the reset button, the "reset" method will be triggered. It will have to set the slider's value to its initial value, and also update the textfield:
- ( IBAction ) reset: ( id ) sender
{
[ slider setFloatValue: initValue ];
[ outputTextField setStringValue: [ self buildFeedbackString: initValue ] ];
}
We are almost finished. There is just one little detail. The NSTextField does not have an initial value. I wil set that value when the interface is created, so I will add the following method to the AppController class:
-( void ) awakeFromNib
{
	initValue = [ slider floatValue ];
	[ outputTextField setStringValue: @"Drag" ];
}
And that's all. Just click Build and Go, and test the application.