[J2ME] Nokia Announces Next Generation Java Platform For Series 60
Nokia announces that the next generation of the Series 60 devices will support the Connected Device Configuration.
« May 2005 | Inicio | July 2005 »
Nokia announces that the next generation of the Series 60 devices will support the Connected Device Configuration.
There are two things we like here at design-nation: dices, and Mac OSX applications. So, we have developed a little application ( you guessed it, a dice ) just to show how is the development process under Mac OSX. This tutorial will cover all the development process, using XCode 2.1 and writing Objective-C code.
As every possible tutorial about XCode in the world, this one is obscured by the tutorial that you can find at the Apple Developer Connection. Go read it!
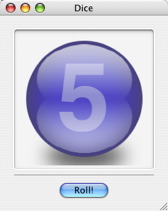
But first, take a look at the final result:
Before we start coding, let’s think about the way that we are going to implement the application. We’ll have to generate a random number between 1 and 6. Then, we’ll load a png containing the face of the dice that corresponds to that random number, and show it in the interface.
It will always be a good practice to implement any application following the MVC paradigm, but, we’ll see how XCode and the Interface Builder make that implementation extremely easy and intuitive.
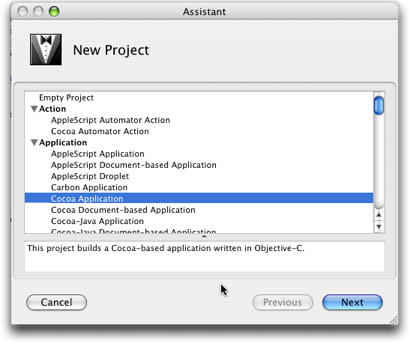
So, let’s start working. First of all, open XCode ( if you don’t find it, it’s hidden in the /Developer/Applications folder ). Then select File-> New Project, and when prompted, select "Cocoa Application". Then, select the name and location of your project files. After that, the "Project window" will be displayed
We won’t explain what are the files and folders that XCode has created. There are a lot of tutorials ( and even the XCode docs ) that explain it. So we will start working in our interface.
But, why will we start working on the interface?. Our application will be MVC- based. That means that the user interface ( the view ) will be completely independent of the core logic ( the model ). And XCode and the interface builder do an excellent job in building MVC based applications. A special MVC. Some people will say that it’s not really MVC, although it’s the implementation we most like.
So, double-click the MainMenu.nib file. That will launch the Interface Builder.
The Interface Builder is a visual tool that will help us build the interface of our app. And using the Interface Builder, we will assure ourselves than the user interface of our application will follow Apple’s User Interface Guidelines. Let’s see how.
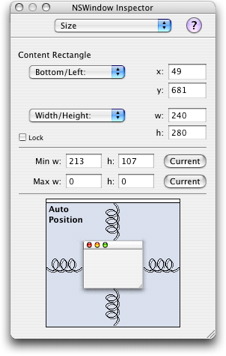
First of all, adapt the size of the program window to your needs. To do so, you can just drag the lower-right corner of the window, or open the Inspector, select Size, and enter the values. We entered 240 as width and 280 as height. In the attributes section, you can change the window’s name, background, and some other properties.
Now, it’s time to add the UI elements that we are going to need. We’ll add a NSImage View ( from the Cocoa-Containers tab ) and a Button ( from the Cocoa-controls tab ).
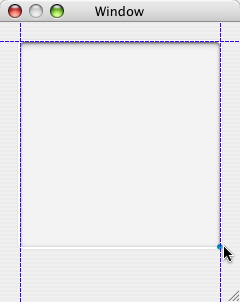
Drag the image view, and drop it over the window. As your drag it, you’ll see how the interface builder draws some lines to help you position the item. Following those guides will ensure you that you’re following Apple’s User Interface Guidelines.
Then add the button to the interface. Drag the button from the palette to your application’s interface ( remember, let the guides, you know, guide you ), and after dropping it, while it’s still selected, press Option, and move it using the cursor. You’ll see how the Interface Builder shows the distance from the button to the interface item under the cursor. So place the cursor over the ImageView, and center the button.
Now, set the button’s text ( double-click it ), and in the info panel, go to the attributes pane and select the keyboard shortcut for the button ( in this example, Enter ).
Now, it’s time to set the initialFirstResponser for your interface. So, you can be sure that your button will be focused when the application loads. To do so, Control+Drag a connection line from the window instance in the MainMenu.nib window to the button, then, in the info window select initialFirstResponder, and click "Connect".
So, the interface is almost finished. Don’t forget to save the nib file. Now it’s time to connect this interface with the application’s model. To do so, we’ll use the controller.
But before doing so, we’ll take a quick look at what outlets and actions are. Outlets are instance variables that point to another object. So, that’s it. An outlet is a reference that an object has to another object. An action is similar to a public method in the class. It is like a command encapsulated with its target.
Anyway, the Interface Builder simplifies the process of creating outlets and actions.

First of all, we’ll have to specify the controller class, then we’ll create an instance of that class, and after that we’ll connect that class to the interface. So, first, create the class. In the classes pane of the MainMenu.nib window, click NSObject in the leftmost column, and then press return. Then, name the new class "DiceController". That way, you will create a subclass of NSObject ( every class in objective-c extends NSObject ) .
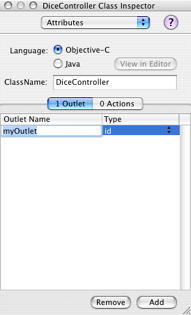
Now, we’ll define the outlets of that class. DiceController is, well, the controller, so it will have an outlet to the NSImageView in the user interface, and also to the model ( a class that we have not created yet ). So, select "DiceController", and in the info window, be sure to select the Attributes pane. Then, be sure that the Outlets pane is also selected, and then just click add. Name the outlet imageView and select its type to NSImageView ( a bit of strong typing will do no harm ).
Now, add another outlet. That second outlet will point to the model. Name it dice.
Now, let’s create the action that will be triggered when the button is clicked. Click the actions pane ( in the info window ), click the add button, and give the action the following name: roll ( the interface builder will add a colon ":" after the name ).
So, the controller has been described, including its outlets and actions. Now it’s time to connect this class to the interface. . To do so, first, we’ll have to create an instance of the DiceController class, selecting the class in the MainMenu.nib window, and then selecting Instantiate in the Classes menu. The new created instance will appear in the instances view. To connect it to the interface, Control-drag from the class instance to the NSImageView in the interface. When the mouse button is released, select the outlet that will be assigned to that connection ( in our example "imageView" ), and click connect. To connect the button in the view with the instance of DiceController, Control-Drag from the button in the interface to the instance of DiceController. When the mouse is released, select roll in the actions column, and click Connect

To create the model ( Dice ), just define a new subclass of NSObject and create an instance of the new class. Then, create an outlet connection between DiceController and Dice. So, everything is connected now!.
Once the interface is finished, and the classes are connected, we have to generate the source files that contain, you guessed it, the source code of the controller and the model. So, go to the classes panel of the MainMenu.nib window, select one of those classes ( DiceController, for instance ), and the select Create classes in the Classes menu. Do the same with DiceModel.
Browse the new created files. You’ll see that there is an empty method called roll in the DiceController.m file. Just implement it:
@implementation DiceController

- (IBAction)roll:(id)sender
{
[ imageView setImage: [ dice image ] ];
}

@end
The code is quite simple. We will just set the content of the NSImageView ( which is one of the outlets of the DiceController class ), setting its value with an image returned by the Model ( the other outlet )
Now, it’s time to implement the model. The model will have a method that will generate a random number ( between 1 and 6 ) and load a different png from disk depending of that value. Then it will and pass an NSImage instance to the controller.
So, the constructor of the model will be:
-( id ) init
{
self = [ super init ];
image = nil;
srand( time( NULL ) );
return self;
}
The NSImage will be released , to avoid memory leaks, when the model is deallocated:
- ( void ) dealloc
{
[ image release ];
[ super dealloc ];
}
The method that loads the png will get it from the application bundle. So, first, it will need to use the NSBundle class:
-( NSImage* ) image
{
NSBundle *bundle = [ NSBundle bundleForClass: [ self class ] ];

NSString *imgName = [ bundle pathForResource: [ self generateImageName ] ofType: @"png" ];

image = [ [ NSImage alloc ]
			initWithContentsOfFile: imgName ];

return image;
}
The complete code of the Dice.m file will be:
#import "Dice.h"

@implementation Dice

-( id ) init
{
self = [ super init ];
image = nil;
srand( time( NULL ) );
return self;
}

- ( void ) dealloc
{
[ image release ];
[ super dealloc ];
}

-( NSString* ) generateImageName
{
int random = ( rand( ) % 6+ 1 );

return [ NSString stringWithFormat: @"%i", random ];
}

-( NSImage* ) image
{
NSBundle *bundle = [ NSBundle bundleForClass: [ self class ] ];

NSString *imgName = [ bundle pathForResource: [ self generateImageName ] ofType: @"png" ];

image = [ [ NSImage alloc ]
		initWithContentsOfFile: imgName ];

return image;
}

@end
Now, build the application, and you are done!. Well, not really.. We’ll have to package our application properly. We’ll create a disk image containing the application bundle and a rtf file with the installation instructions ( something like "drag the app bundle to your Applications folder" ).
We’ll create the disk image using the Disk Utility, ( /Applications/Utilities/Disk Utility ). Open the Disk Utility, create a new Disk Image, assign its size, and it will be created and mounted. Drag your application bundle and all the other files you want to include into the new Disk Image, and you’re done.
And that's all!
Don't repeat yourself. When you write the same code more than once, you are starting to paint yourself into a corner.
See, for instance, this example.
I'm working on an application where I'm going to use the UI components. It's a MVC application, so the view is completely abstracted from the application's logic.
There's more than one view ( there are many different screens where I have to show the model data in different ways ), so I've thought that it will be better to build a different class for each view ( each screen ).
So, each view will attach a movieclip that contains the screen's graphics and interactive elements ( buttons, datagrids, whatever ). All those view inherit from a class that implements event dispatching, and some more common code. That's one reason to not inherit from movieclip. There are other ones, but I should not want to discuss them now. Anyway...
Also, I still don't have the definitve graphic assests. Even more, if the budget is big enough, I'll have to develop my own set of components, and use it.
So, imagine that you run the application. The first screen you'll find will be the login screen.
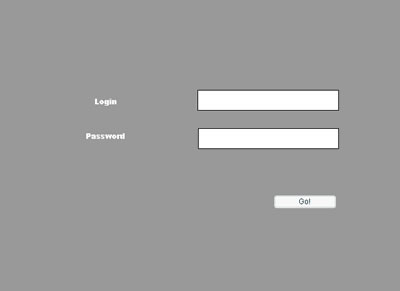
As you see in the screenshot, that screen contains a component. Here's the LoginView code:
import mx.utils.Delegate;

class LoginView
{
private var timeline	: MovieClip;
private var loginScreen: MovieClip;

function LoginView( tl: MovieClip )
{
this.timeline = tl;
}

public function init( )
{
this.loginScreen = this.timeline.attachMovie( "LoginScreen", "LoginScreen",
				 	this.timeline.getNextHighestDepth( ), { _x: 0, _y: 0 } );

this.loginScreen.loginBtn.label= "Go!";
this.loginScreen.loginBtn.addEventListener( "click", Delegate.create( this, click ) );
}

private function click( )
{
trace( "click" );
}

}
So, when I want to show that screen, I'll do something like:
var loginView: LoginView = new LoginView( this );
loginView.init( );
And the button doesn't work. It doesn't even shows the right message. Some minutes of googling, and a bit of common sense and knowledge of the platform, told me that maybe, the button is not initialized when the movieclip is attached, so maybe I should wait a frame to assign its text.
import mx.utils.Delegate;

class View
{
private var timeline	: MovieClip;
private var loginScreen: MovieClip;

function View( tl: MovieClip )
{
this.timeline = tl;
}


public function init( )
{
this.loginScreen = this.timeline.attachMovie( "LoginScreen", "LoginScreen",
				 	this.timeline.getNextHighestDepth( ), { _x: 0, _y: 0 } );

var theView: View = this;

this.loginScreen.onEnterFrame = function( )
{
theView.initButton( );

delete this.onEnterFrame;
}

}

private function initButton( )
{
this.loginScreen.loginBtn.label= "Go!";
this.loginScreen.loginBtn.addEventListener( "click", Delegate.create( this, click ) );
}

private function click( )
{
trace( "click" );
}

}
It's solved. But this solution smells ( not only because of the scope trick ). I'll have various screens that contain components ( maybe 10-12 ), so I'll have to write that code in 10 classes. Sure, I could write a base class and move that code to that base class, but that's not a solution, because not all my views will have the same amount of buttons, so there's not sense in subclassing just to override later. And my views are subclasses of another base class yet.
Even worse, probably, I'll have to develop my own components, so maybe, that code will have to be changed.
So, I'm repeating code, and that code will be probably changed in a near future. What should I do?. Encapsulate it into its own class.
To do so, I'll use my old Callback class:
class Callback
{
private var callbackObjVal: Object;
private var callbackMethodVal: String;

public function Callback( objParam: Object, methodParam: String )
{
this.callbackObjVal              = objParam;
this.callbackMethodVal           = methodParam;
}


public function fire( parameter: Object ): Object
{
return this.callbackObjVal[ this.callbackMethodVal ]( parameter );
}

}
So, I'll write a ButtonHandler class:
class ButtonHandler
{
public static function initButton( mc: MovieClip, callback: Callback )
{
var cb: Callback = callback;

mc.onEnterFrame = function( )
{
cb.fire( );
delete this.onEnterFrame;
}
}
}
And I'll use it this way:
import mx.utils.Delegate;

class View
{
private var timeline	: MovieClip;
private var loginScreen: MovieClip;

function View( tl: MovieClip )
{
this.timeline = tl;
}

public function init( )
{
this.loginScreen = this.timeline.attachMovie( "LoginScreen", "LoginScreen",
								 	this.timeline.getNextHighestDepth( ), { _x: 0, _y: 0 } );

ButtonHandler.initButton( this.loginScreen, new Callback( this, "initButton" ) );
}

private function initButton( )
{
this.loginScreen.loginBtn.label= "Go!";
this.loginScreen.loginBtn.addEventListener( "click", Delegate.create( this, click ) );
}

private function click( )
{
trace( "click" );
}

}
Overkill?. Well, the solution is a bit complex, but it's the one that most satisfies me, because it's the one that brings more flexibility. If I have to change the way I manage the buttons, I just have to change the implementation of one method in one class, and I don’t have to change any interface. I'm coding for the interface, not for the implementation.
I guess this post will not mean too much to the experienced Java developers out there, but this is something that I've found interesting.
onjava.com has posted an article about Prevailer. Prevailer is a framework that provides a prevalence layer for Java applications. But what does that mean?.
Instead of using a database or the native serialization mechanism, a prevalent system will take periodic screenshots of its state, and serialize them. Also, it will use command objects to perform the transactions that change the system state, and serialize them. That way, it ensures that the system is consistent.
Anyway, the article by Jim Paterson provides a complete example of implementation:
Well, today it's the "Oh, my" day. The hell has frozen and Apple has announced that will made the switch to Intel.
I'm still a bit shocked, and I still don't have a clear opinion about the switch, but, XCode 2.1 is available for download for all ADC members. And Apple has also published an Introduction to Universal Binary Programming Guidelines.
Update: Some more info about XCode 2.1
Update: Release notes
Be aware!. Professor Coupling and his army of clones are ready!.The final attack is going to be launched quite soon!. And their weapons are actionScript and design patterns!
In the previous posts, we’ve seen how Professor Coupling is able to clone any animal, and how he’s able to assign different roles to those clones. Oh, and he has also found the way to assign any animal its orders. Muhahahahahaha
First of all, remember: Professor Coupling is crazy, but he’s not an idiot. He knows that maybe, his evil plan has some weak points, that maybe, there could be some mistakes. And he also knows that sometimes it’s better to go back to the starting point to gather some strength and launch a new attack ( well, you know, it’s not easy to conquer the world ). He wants to be able to tell his troops to cancel the attack if something goes wrong ( you know, please insert some hysterical laughs here ) .
So, he has equipped his troops with the newest model of EnigmaRadio ( enigmawoot!!??? ). The EnigmaRadio is the last invention of Professor Coupling’s evil genius, and basically it’s, well, a radio receiver, that is cheaper than an iPod. Not as cool as an iPod, but cheaper.
But why? Why would a sheep or a cow need a radio?. Well, conquering-the-world-battles are noisy. It’s not easy to communicate with your troops when you are in the middle of such destruction. There’s noise, there’s dust, fog… In fact, sometimes, you might be thinking that you are giving an order to a sheep, but you are talking to a cow. Well, a complete mess. And, of course, Professor Coupling is aware of all these communication problems.
Professor Coupling has been using his evil genius to find a solution. The solution he has found ( muhhhahahahahahah ) has been to assign a cow the responsibility of propagating his orders. In plain English, there will be a cow ( Corporal Cow ) whose duty will be to run all the way to the trenches, and then, one by one, give all the cows and sheeps the new orders. Brilliant!!!!.
Well, not so brilliant. What if someone kills ( sorry, gratuite violence again ) Corporal Cow when he still hasn’t given the new orders to all the soldiers?.
And so, Professor Coupling, once again, remembered when he was a young student, and the happy times when he studied the Observer pattern.
That’s why Professor Coupling, who is crazy but is not an idiot, has equipped all his troops with the latest model of the EnigmaRadio. The EnigmaRadio will we tuned to BBC Radio 4 ( why not? ). So, his troops will charge against the enemy with their radios switched on, and as soon as they hear “In the navy”, by Village People, they will now that it’s time to go back to their starting position.
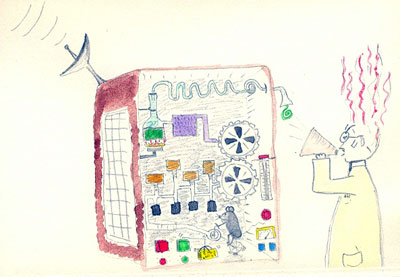
Dj Coupling broadcasting his program
The code will be something like this:
interface IObserver
{
public function update(  info: Object ): Void;
}
interface ISubject
{
public function addObserver( obs: IObserver ) : Boolean;
public function removeObserver( obs: IObserver ) : Boolean;
public function notifyObserver( info: Object ) : Void;
}
class Cow implements IObserver
{
function Cow( )
{
this.init( );
}

private function debug( arg: String ): Void
{
trace( "Vaca | Cow: ->"+arg );
}

private function init( ): Void
{
debug( "init" );
}

public function update( info: Object ) : Void
{
debug( "La emisora del profesor ha emitido | song in the radio is: "+info.cancion );
debug( enigmaResult( info.cancion ) );
}

private function enigmaResult( arg: String ): String
{
debug( "soy la máquina enigma interpretando qué hacer | I am the enigma machine" );
if( arg != "In the Navy" )
{
return "sigo a lo mío. MUUU | nothing to do MUUUUU";
}
else
{
return "cielos, llegó el momento. MUUUUUUUUUUU | Oh, my God, it's the signal MUUU";
}

}

}
class Sheep implements IObserver
{
function Sheep( )
{
this.init( );
}

private function debug( arg: String ): Void
{
trace( "Oveja | Sheep: ->"+arg );
}

private function init( ): Void
{
debug( "init" );
}

public function update( info: Object ) : Void
{
debug( "La emisora del profesor ha emitido | song in the radio is: "+info.cancion );
debug( enigmaResult( info.cancion ) );
}

private function enigmaResult( arg: String ): String
{
debug( "soy la máquina enigma interpretando qué hacer | I am the enigma machine" );
if( arg != "In the Navy" )
{
return "sigo a lo mío. BEEEEE | nothing to do BEEEEEE";
}
else
{
return "cielos, llegó el momento. BEEEE | Oh, my God, it's the signal BEEEEEE";
}

}

}
class Profesor implements ISubject
{
private var arrayObservers: Array;
function Profesor( )
{
init( );
}
private function debug( arg: String ) : Void
{
trace("Profesor: ->"+arg);
}
private function init( ): Void
{
debug( "init" );
this.arrayObservers = new Array();
}
public function addObserver( obs: IObserver ): Boolean
{
debug( "registrando | registering" );
this.arrayObservers.push( obs );
return true;
}
public function removeObserver( obs: IObserver ) : Boolean
{
var longObservers: Number = this.arrayObservers.length;
for ( var k: Number = 0; k< longObservers; k++ )
{
var tmpObserver: IObserver = this.arrayObservers[ k ];
if( tmpObserver == obs )
{
this.arrayObservers.splice( k, 1 );
break;
}
}
return true;
}
public function notifyObserver( info: Object ): Void
{
var longObservers: Number = this.arrayObservers.length;
for ( var k: Number = 0; k
And the first frame of the main timeline
var pd: Profesor = new Profesor();
var myCow: Cow = new Cow( );
var mySheep: Sheep = new Sheep( );
pd.addObserver( myCow );
pd.addObserver( mySheep );
var info:Object = new Object();
info.cancion = "In the Navy";
pd.notifyObserver( info );
Muhahahahahahhahahahaha ( almost half an hour of hysterical laughs ). Professor Coupling has found a quick and reliable way of sending messages to his troops. It’s perfect!! Well, really?. Maybe it’s not so perfect.
Imagine that, for instance, Professor Coupling wants his soldiers to report back when they receive the new orders. Or imagine that Professor Coupling can infiltrate a sheep into the enemy’s headquarters. That spy could not communicate with Professor Coupling to tell him when the perfect moment to launch the attack comes!!!.
But, Professor Coupling, who is crazy but is not an idiot, has previously thought about it, and has decided to implement a mechanism in the EnigmaRadio that could serve his troops to communicate back with him. So, the spy sheep, as soon as it discovers the enemy’s weakest point, could phone the EnigmaRadio base station and ask them to broadcast Boney M’s "Rasputin" ( their secret "attttttaaaaaaaaaaaaaack" signal ). So, when Professor Coupling’s troops hear "Rasputin" through their EnigmaRadio, they will know that the moment has come, that it will be the moment to launch the final attack.
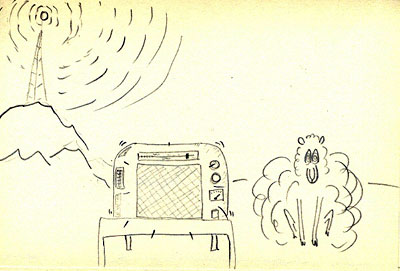
A sheep singing "In the Navy"
So, Professor Coupling will have to change his code a bit ( but he doesn’t care, listen: "Muhahahahahahahaaaaa" ). He will start adding a new method ( requestInfo ) to the ISubject interface . That method will allow his radio station to receive the telephone calls from the Spy Sheep. He has also changed the constructor of the Cow and Sheep classes.
interface ISubject
{
public function addObserver( obs: IObserver ) : Boolean;
public function removeObserver( obs: IObserver ) : Boolean;
public function notifyObserver( info: Object ) : Void;
public function requestInfo( arg: String ): Void
}
class Cow implements IObserver
{
private var profesor: Profesor;
function Cow( prof: Profesor )
{
this.profesor = prof;
this.profesor.addObserver(this);
this.init( );
}
private function debug( arg: String ): Void
{
trace( "Vaca | Cow: ->"+arg );
}
private function init( ): Void
{
debug( "init" );
}
public function update( info: Object ) : Void
{
debug( "La emisora del profesor ha emitido | song in the radio is: "+info.cancion );
debug( enigmaResult( info.cancion ) );
}
private function enigmaResult( arg: String ): String
{
debug( "soy la máquina enigma interpretando qué hacer | I am the enigma machine" );
if( arg != "In the Navy" && arg!="Rasputin" )
{
return "sigo a lo mío. MUUU | nothing to do MUUUUU";
}
else
{
return "cielos, llegó el momento. MUUUUUUUUUUU | Oh, my God, it's the signal MUUU";
}
}
}
class Sheep implements IObserver
{
private var profesor: Profesor;
function Sheep( prof: Profesor )
{
this.profesor = prof;
this.profesor.addObserver(this);
this.init( );
}
private function debug( arg: String ): Void
{
trace( "Oveja | Sheep: ->"+arg );
}
private function init( ): Void
{
debug( "init" );
}
public function update( info: Object ) : Void
{
debug( "La emisora del profesor ha emitido | song in the radio is: "+info.cancion );
debug( "enigmaResult: "+enigmaResult( info.cancion ) );
}
private function enigmaResult( arg: String ): String
{
debug( "soy la máquina enigma interpretando qué hacer | I am the enigma machine" );
if( arg != "In the Navy" && arg!="Rasputin" )
{
debug("un momento, debemos atacar ");
debug("wait a moment, we must attack");
debug("pediré un ataque | I'll ask for an attack ");
askForAttack( );
return "he solicitado un ataque | i've asked for an attack";
//return "sigo a lo mío. BEEEEE | nothing to do BEEEEEE";
}
else
{
return "cielos, llegó el momento. BEEEE | Oh, my God, it's the signal BEEEEEE";
}
}
private function askForAttack( ): Void
{
this.profesor.requestInfo( "Rasputin" );
}
}
class Profesor implements ISubject
{
private var arrayObservers: Array;
function Profesor( )
{
init( );
}
private function debug( arg: String ) : Void
{
trace("Profesor: ->"+arg);
}
private function init( ): Void
{
debug( "init" );
this.arrayObservers = new Array();
}
public function addObserver( obs: IObserver ): Boolean
{
debug( "registrando | registering" );
this.arrayObservers.push( obs );
return true;
}
public function removeObserver( obs: IObserver ) : Boolean
{
var longObservers: Number = this.arrayObservers.length;
for ( var k: Number = 0; k< longObservers; k++ )
{
var tmpObserver: IObserver = this.arrayObservers[ k ];
if( tmpObserver == obs )
{
this.arrayObservers.splice( k, 1 );
break;
}
}
return true;
}
public function notifyObserver( info: Object ): Void
{
var longObservers: Number = this.arrayObservers.length;
for ( var k: Number = 0; k
And in the main timeline:
var pd: Profesor = new Profesor();
var myCow: Cow = new Cow( pd );
var mySheep: Sheep = new Sheep( pd );
var info:Object = new Object();
info.cancion = "Any song";
pd.notifyObserver( info );
All these classes have been simplified to the maximum, because we just wanted to show how the pattern works, and to show that Professor Coupling is an evil genius, but he’s not an idiot ( the image fades to black, and "The End" appears ).
And remember, Professor Coupling is spanish, and a bit lazy, so he's left some comments in his mother tongue...
You can download the source code here
First of all, remember: Professor Coupling is crazy, but he’s not an idiot. He knows that maybe, his evil plan has some weak points, that maybe, there could be some mistakes. And he also knows that sometimes it’s better to go back to the starting point to gather some strength and launch a new attack ( well, you know, it’s not easy to conquer the world ). He wants to be able to tell his troops to cancel the attack if something goes wrong ( you know, please insert some hysterical laughs here ) .
So, he has equipped his troops with the newest model of EnigmaRadio ( enigmawoot!!??? ). The EnigmaRadio is the last invention of Professor Coupling’s evil genius, and basically it’s, well, a radio receiver, that is cheaper than an iPod. Not as cool as an iPod, but cheaper.
But why? Why would a sheep or a cow need a radio?. Well, conquering-the-world-battles are noisy. It’s not easy to communicate with your troops when you are in the middle of such destruction. There’s noise, there’s dust, fog… In fact, sometimes, you might be thinking that you are giving an order to a sheep, but you are talking to a cow. Well, a complete mess. And, of course, Professor Coupling is aware of all these communication problems.
Professor Coupling has been using his evil genius to find a solution. The solution he has found ( muhhhahahahahahah ) has been to assign a cow the responsibility of propagating his orders. In plain English, there will be a cow ( Corporal Cow ) whose duty will be to run all the way to the trenches, and then, one by one, give all the cows and sheeps the new orders. Brilliant!!!!.
Well, not so brilliant. What if someone kills ( sorry, gratuite violence again ) Corporal Cow when he still hasn’t given the new orders to all the soldiers?.
And so, Professor Coupling, once again, remembered when he was a young student, and the happy times when he studied the Observer pattern.
That’s why Professor Coupling, who is crazy but is not an idiot, has equipped all his troops with the latest model of the EnigmaRadio. The EnigmaRadio will we tuned to BBC Radio 4 ( why not? ). So, his troops will charge against the enemy with their radios switched on, and as soon as they hear "In the navy", by Village People, they will now that it’s time to go back to their starting position.
Dj Coupling broadcasting his program
The code will be something like this:
public interface IObserver
 {
public void update(Message info);
}
public interface ISubject
{
public void addObserver(IObserver obs);
public void removeObserver( IObserver obs );
public void notifyObserver( );
}
public class Cow implements IObserver
{
public Cow( )
{
debug("Soy una vaca  muuuuuu| I am a cow Muuuu");
}

private void debug( String arg )
{
System.out.println("Vaca | Cow :-> "+arg );
}

public void update( Message msg )
{
debug("Actualizada | update ");
String kk = msg.getMsg();
debug("msgText: "+kk );
}

}
public class Sheep implements IObserver
{

public Sheep( )
{
debug("creada la oveja | a new sheep");
}

private void debug( String arg )
{
System.out.println("Oveja |Sheep :-> "+arg );
}

public void update( Message msg )
{
debug("Actualizada | update ");
String kk = msg.getMsg();
debug("msgText: "+kk );
}
}
The message:
public class Message {
String msg = "";

public void setMsg( String arg )
{
this.msg = arg;
}

public String getMsg( )
{
return this.msg;
}
}
public class Profesor implements ISubject
{
private ArrayList misObservers;
private Message miMsg;

public Profesor( )
{
//System.out.println("profesor profesor");
debug("Creando al profesor | a new Profesor");
misObservers = new ArrayList();
}

public void debug( String arg )
{
System.out.println("Profesor:-> "+arg);
}

public void addObserver( IObserver obs )
{
debug("añadido observer | a new observer");
misObservers.add(obs);
debug("Ya tengo | I have: "+misObservers.size()+" observers ");
}

public void removeObserver( IObserver obs)
{
debug("eliminado observer | removing observer");
//int value = indexOf
misObservers.remove(misObservers.indexOf(obs));
debug("ahora me quedan | now i have : "+misObservers.size()+" observers ");
}

public void notifyObserver( )
{
debug("notificar observers | notify observer ");
miMsg = new Message( );
miMsg.setMsg("In the Navy");
for( int i = 0; i < misObservers.size(); i++ )
{
IObserver obs = ( IObserver )misObservers.get(i);


obs.update( miMsg );
}
}

}
And finally
public class ObserverSample
 {
public static void main(String[] args)
 {
Profesor prof = new Profesor();
Sheep firstSheep = new Sheep();
Cow firstCow = new Cow();
Sheep secondSheep = new Sheep( );
Cow secondCow = new Cow( );
Sheep thirdSheep = new Sheep();
Cow thirdCow = new Cow();

prof.addObserver( firstsheep );
prof.addObserver( secondSheep );
prof.addObserver( thirdSheep );
prof.addObserver( firstCow );
prof.addObserver( secondCow );
prof.addObserver( thirdCow );
prof.removeObserver( firstSheep );
prof.notifyObserver( );

}
}
Muhahahahahahhahahahaha ( almost half an hour of hysterical laughs ). Professor Coupling has found a quick and reliable way of sending messages to his troops. It’s perfect!! Well, really?. Maybe it’s not so perfect.
Imagine that, for instance, Professor Coupling wants his soldiers to report back when they receive the new orders. Or imagine that Professor Coupling can infiltrate a sheep into the enemy’s headquarters. That spy could not communicate with Professor Coupling to tell him when the perfect moment to launch the attack comes!!!.
But, Professor Coupling, who is crazy but is not an idiot, has previously thought about it, and has decided to implement a mechanism in the EnigmaRadio that could serve his troops to communicate back with him. So, the spy sheep, as soon as it discovers the enemy’s weakest point, could phone the EnigmaRadio base station and ask them to broadcast Boney M’s "Rasputin" ( their secret "attttttaaaaaaaaaaaaaack" signal ). So, when Professor Coupling’s troops hear "Rasputin" through their EnigmaRadio, they will know that the moment has come, that it will be the moment to launch the final attack.
A sheep singing "In the Navy"
So, Professor Coupling will have to change his code a bit ( but he doesn’t care, listen: "Muhahahahahahahaaaaa" ). He will start adding a new method ( requestInfo ) to the ISubject interface . That method will allow his radio station to receive the telephone calls from the Spy Sheep. He has also changed the constructor of the Cow and Sheep classes.
public interface ISubject
 {
public void addObserver(IObserver obs);
public void removeObserver( IObserver obs );
public void notifyObserver( Message msg );
public void requestInfo( String arg  );
}
public class Cow implements IObserver
{
public Cow( )
{
debug("Soy una vaca | I am a cow ");
}

private void debug( String arg )
{
System.out.println("Vaca | Cow :-> "+arg );
}

public void update( Message info )
{
debug("Actualizada | update ");
debug(" -> "+ info.getMsg());
}

}
public class Sheep implements IObserver
{
private ISubject profesor;
public Sheep(ISubject isub )
{
debug("creada la oveja | a new Sheep");
this.profesor = isub;
this.profesor.addObserver(this);
this.profesor.requestInfo( "Rasputin" );
}

private void debug( String arg )
{
System.out.println("Oveja | Sheep:-> "+arg );
}

public void update( Message info )
{
debug("Actualiz·ndome | update");
debug( " -> "+info.getMsg());
}
}
import java.util.ArrayList;

public class Profesor implements ISubject
{
private ArrayList misObservers;

public Profesor( )
{
//System.out.println("profesor profesor");
debug("Creando al profesor | a new profesor");
misObservers = new ArrayList();
}

public void debug( String arg )
{
System.out.println("Profesor :-> "+arg);
}

public void addObserver( IObserver obs )
{
debug("añadido observer | a new observer");
misObservers.add(obs);
debug("Ya tengo | I have: "+misObservers.size()+" observers ");
}

public void removeObserver( IObserver obs)
{
debug("eliminado observer | removing observer");
misObservers.remove(misObservers.indexOf(obs));
debug("ahora me quedan | now i have: "+misObservers.size()+" observers ");
}

public void notifyObserver(Message msg )
{
debug("notificar observers | notify observers");
for( int i = 0; i < misObservers.size(); i++ )
{
IObserver obs = ( IObserver )misObservers.get(i);
obs.update( msg );
}
}

public void requestInfo( String arg )
{
debug("recibiendo una petición | someone has asked for ...");
Message msg = new Message( );
msg.setMsg( arg );
this.notifyObserver( msg );
}

}
And finally:
public class ObserverSample
 {

public static void main(String[] args) {
Profesor dispar = new Profesor();
Sheep oveja = new Sheep( dispar );

}
}
A quick note: Professor Coupling knows about the existance of the java.util.Obervable class and the java.uti.Observer interface. But he didn't want to extend Obervable, because he extends a long list of evil geniuses. That's why he has decided to build his own ISubject interface. He could have used the Oberver interface as the base class for the cows and sheep, but you know, that's the way evil geniuses are...
All these classes have been simplified to the maximum, because we just wanted to show how the pattern works, and to show that Professor Coupling is an evil genius, but he’s not an idiot ( the image fades to black, and "The End" appears ).
And remember, Professor Coupling is spanish, and a bit lazy, so he's left some comments in his mother tongue...
You can download the source code here